Soft, Crumbly Wood Around Windows, Fascia, or Trim? What Dry Rot Looks Like
Why your cabinets look worn out
The finish fails first, almost every time. On the cabinets we open up, the wood underneath is usually fine while the topcoat has given out. Years of cooking grease, steam, and hand oils break down the original factory coating, especially on the doors closest to the stove and sink. That is why those doors always look the worst.
Three things drive most of the wear we see. Grease buildup softens and yellows the finish near the range. Moisture from the sink and dishwasher swells the bottom edges of nearby doors. And daily handling wears a dull patch right around every knob and pull. None of that means the cabinet itself is finished. It means the coating that protected it is finished, and a coating is something we can replace.
Quick Answer: Dry rot is wood decay caused by fungi, and it shows up as soft, spongy, crumbly, or cracked wood that breaks into small brown cubes. It starts where water gets in and stays, most often at window corners, fascia boards, door trim, and the bottoms of fences and posts. A screwdriver that sinks into the surface without a fight is the quickest field test. Paint will not stop it. The decayed wood has to be cut out, the moisture source corrected, and the repair sealed and primed before any new coating goes on.
You are standing outside with a cup of coffee, and you notice that the trim under your bedroom window looks a little off. The paint is bubbled along the bottom edge. You press a thumbnail near the corner, and it leaves a dent. Or maybe you are on a ladder cleaning gutters, and a piece of fascia flakes away in your hand like a stale cracker. Nothing about it looks dramatic, but something in your gut says the board is not what it used to be.
That instinct is worth listening to. Soft or crumbly wood around windows, fascia, and trim is one of the most common problems we see on homes in Ojai and across Ventura County, and it rarely stays small. The wood is telling you that water has been getting in for a while, and that a fungus has been quietly eating the board from the inside.
This guide walks through what dry rot actually looks like at each stage, where it hides on a typical California house, how to test a suspect board yourself, and what has to happen before anyone paints over it.
What Dry Rot Actually Is
The name is a little misleading. Wood decay fungi cannot live in truly dry wood. They need moisture content above roughly 27 to 30 percent, which is the point where the cell walls of the wood are saturated and free water is available. The term "dry rot" stuck because the damage looks dry at the end. Brown rot, the most common type on houses, leaves the wood dry, brittle, and powdery once the fungus has consumed the strength of the fibers.
So when someone says a board has dry rot, what they really mean is that it got wet repeatedly, stayed wet long enough for fungi to take hold, and then dried out again after the damage was done. That is why a rotted fascia board can feel dry to the touch on a hot September afternoon and still crumble when you press on it.
Three things have to be present for decay to start: moisture, oxygen, and wood as a food source. Take away any one of them and the process stops. On a house, you can only realistically control the moisture, which is why every lasting repair begins with the question of where the water came from.
What Dry Rot Looks Like at Each Stage
Rot does not announce itself with one obvious sign. It moves through stages, and the early ones are easy to mistake for ordinary paint wear.
Early Stage
The paint blisters, peels, or stains along the bottom edge of a board or at a joint. The wood underneath may look gray or dark. It still feels firm, but a sharp tool pushed into the surface sinks in a little farther than it should.
Middle Stage
The wood feels soft or spongy under finger pressure. The grain starts to look stringy, and you may see fine cracks running across the grain instead of along it. Those cross grain cracks, which break the surface into small rectangles or cubes, are the signature of brown rot. A musty, mushroomy smell is common, especially around window sills.
Advanced Stage
The wood crumbles when you squeeze it. Pieces come away in brown cubes or fine powder. Corners round off, fasteners lose their grip, and a board may visibly sag or pull away from the wall. At this point the board has lost most of its strength and no longer does its job.
Some rot also grows white or yellowish fungal strands on the surface in damp, shaded spots. If you see those, the wood is wet right now, not just historically wet, and the source of the water is still active.
Where Rot Hides on a Southern California House
Dry rot follows water, so the places it shows up are the places where water collects, drips, or gets trapped. On homes here, the same handful of locations come up again and again.
Window Corners and Sills
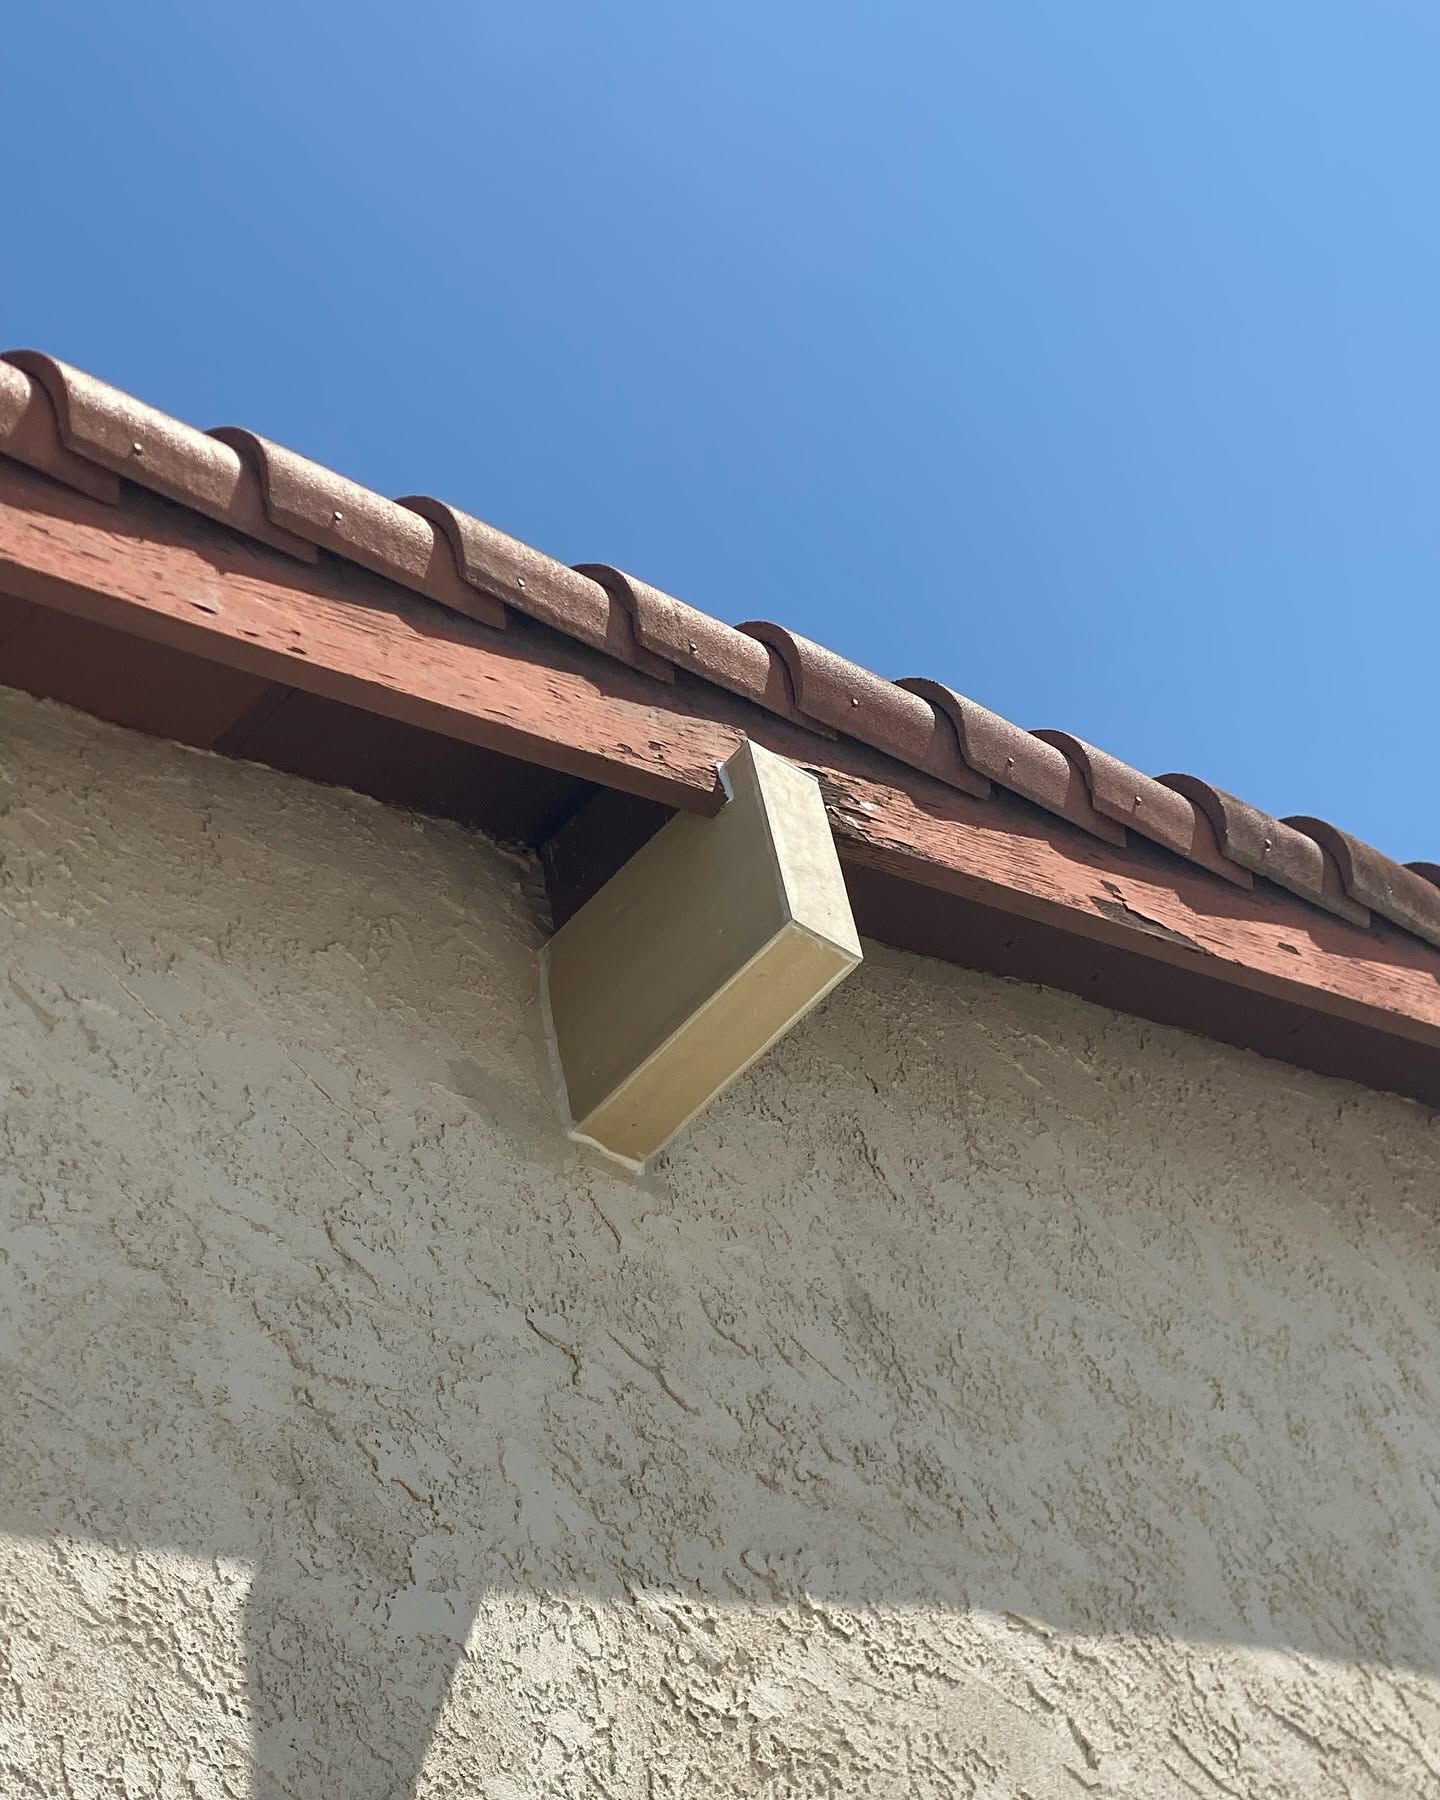
Rainwater collects on sills and enters bottom corner joints, especially when surfaces slope inward or caulking fails.
Fascia Boards and Rafter Tails
Overflowing gutters soak fascia boards, while exposed rafter end grain absorbs water quickly, encouraging wood decay and deterioration.
Door Trim and Thresholds
Rain splash and sprinklers wet lower door trim, while trapped moisture can swell frames and cause sticking doors.
Deck Connections, Posts, and Fence Bottoms
Wood touching soil or concrete absorbs moisture. Deck ledgers against house walls can trap water and accelerate hidden decay.
Siding Seams and Butt Joints
Failed paint or caulk allows water behind horizontal siding seams, especially near downspouts and beneath roof valleys.
Here in the Ojai Valley, you might assume that dry weather protects you. It does not. Morning marine layer and coastal fog, winter storms that dump a lot of water in a short time, and automatic sprinkler systems that spray the base of the house all keep wood wetter than it looks. Sprinklers are one of the sneakiest culprits, because they wet the same boards on a schedule, every week, all summer long.
Tip: Walk the outside of your house after your sprinklers run. Any head that sprays siding, trim, or the bottom of a door frame is feeding rot on a timer. Redirecting a spray pattern takes minutes and removes one of the most common water sources.
How to Test a Suspect Board
You do not need special equipment to tell whether wood has soft spots. A few simple checks will tell you most of what you need.
The Probe Test
Press a screwdriver into the wood near lower edges and corners. Healthy wood resists, while decay allows deeper penetration.
The Pick Test
Lift a small splinter along the grain. Healthy wood produces long, crisp splinters, while rotten wood breaks short with dull sounds.
The Squeeze and Tap Test
Press boards every few inches and tap with a screwdriver handle. Soft spots yield easily, while decayed sections sound hollow.
The Water Source Check
Inspect above damaged wood for leaking gutters, failed caulk, missing flashing, roof edges, or sprinklers. Repair the moisture source before replacing boards.
Probe in a few places, not just the one spot you noticed. Rot often runs farther along a board or behind a corner than the visible damage suggests, and the part you can see may be the smaller part of the problem.
Why Paint Will Not Fix It
It is tempting to scrape, fill, and repaint. A can of filler and a fresh coat of paint make a soft board look sound, and sometimes it looks sound for a year. The trouble is that paint is a surface film, and the problem is inside the wood.
Decayed wood has lost its strength, so paint has nothing solid to hold onto. It also stays damp, and trapped moisture pushes paint off from behind. The fungus is still alive in the board as long as the moisture remains, and it continues to spread into the healthy wood around it. A painted over repair often fails within a season, and the next time you see it, the damage is bigger.
That is why the sequence matters. Rot repair comes first, and paint comes last. Everything in between is what makes the paint last.
What a Proper Repair Involves
The right repair depends on how far the decay has traveled and what the board does for the house.
Cut It Out Completely
Remove all decayed wood until firm, healthy material remains. Replace damaged fascia sections or cut out rotten window sill portions completely.
Fix the Water Source
Repair flashing, adjust gutters, replace failed caulk, correct water collecting slopes, or redirect sprinklers to prevent recurring moisture damage.
Decide Between Patching and Replacing
Use consolidants and structural epoxy for small, localized damage. Replace compromised structural components, including rafter tails, load bearing door jambs, and deck ledgers.
Seal Every Cut Face
Seal and prime newly cut wood, especially exposed end grain. Treat every surface and edge to reduce moisture absorption and improve durability.
Prime and Paint to Match the Surroundings
Apply quality exterior primer, seal joints, and finish with two paint coats. Use flexible exterior sealant between boards to limit future water entry.
Warning: Rotted wood is not only a cosmetic problem. Decayed wood loses strength, and it also ignites at lower temperatures and burns faster than sound wood. On eaves, fascia, and trim in a fire prone area, soft boards are a weak point you want gone before fire season, not after.
Rot and Wildfire Season Are Connected
This is the part many homeowners do not expect. In wildfire country, the same eaves, fascia, and trim that tend to rot are the places where windblown embers collect and find a way in. A crumbling fascia or an open gap at a rotted rafter tail gives embers an easy path into the attic and framing.
Sound, sealed, well painted wood is simply harder for an ember to ignite and harder for it to get behind. For homes in the foothills around Ojai, Santa Paula, and Thousand Oaks, that makes rot repair part of basic home hardening. When the work is done, ask whether coatings and details at the eaves can be upgraded at the same visit, because the crew is already there and the surfaces are already open.
A Quick Seasonal Habit That Catches It Early
You can catch most rot while it is still a small repair with a ten minute walk around the house twice a year. Once in the fall, before the rains start, and once in late spring.
On each walk, look at the bottom edge of every window and door frame, run your eye along the fascia line from the ground, check the corners where trim boards meet, and test any wood that touches concrete or soil. Look for bubbled paint, dark staining, hairline cracks across the grain, open caulk lines, and anything that gives under a screwdriver.
Write down what you find, take a photo, and recheck it in a few months. Rot that has not changed is probably old and dormant. Rot that has grown means active moisture, and it is time to act.
Frequently asked questions
Is dry rot the same thing as wet rot?
Both are fungal wood decay needing moisture. "Dry rot" describes how damaged wood looks afterward, brittle and crumbly, not how it formed. The repair is the same: remove decayed wood and fix the water source.
Can dry rot spread to the rest of my house?
Yes, through connected wood if moisture persists. Most rot stays near the wet spot, but uncorrected water lets decay travel along boards into framing and trim. Cutting it out early limits how much wood is involved.
Can I just fill soft wood with wood filler and paint it?
No. Filler levels a surface but restores no strength and leaves the fungus and moisture in place. It works only as a cosmetic touch on firm wood after decayed material is cut away.
How can I tell rot from ordinary peeling paint?
Peeling paint on sound wood reveals a hard surface. If a screwdriver sinks in, the wood feels spongy, or the grain breaks into cubes, it is decay. Quick recurring peeling suggests trapped moisture.
Why does rot show up on the bottom of window frames first?
Water runs downward and collects at the lowest point. Bottom corners catch drips, lose caulk first, and stay damp longest, so decay usually begins there and works upward.
Does rot always mean the whole board needs to be replaced?
Not always. Small damage in non structural spots can be cut out and rebuilt with new wood or repair systems. Structural pieces and boards with lengthwise decay are usually replaced after inspection.
Catching Rot Before It Takes the Whole Board
Soft, crumbly wood is a signal, and the best time to answer it is early, while the repair is small and the framing behind it is still sound. If a screwdriver sinks easily into your window trim or fascia, painting over it only hides the problem for a season. Cutting out the decay, correcting the water source, and sealing every cut face before finish coats go on is what makes a repair last, and a twice yearly walk around the house catches most trouble first.
Rot repair
also doubles as basic home hardening in fire country, since sound, sealed eaves and trim are harder for embers to reach. McKay's Painting Inc
has spent 50+ years repairing and repainting homes in Ojai and Ventura County, CA, and that time has shown that probing boards, fixing sprinkler and gutter issues, and priming every edge prevent the same damage from returning. A house maintained this way stays solid, protected, and ready for the next wet winter.
Share this article